Model
106 (aka 146) - Single Track BlockA, Introduction |
||||
- [an error occurred while processing this directive]
|
Sections shown below on this page:
|
|||
Model
106 (aka 146) - Single Track BlockA, Introduction |
||||
- [an error occurred while processing this directive]
|
Sections shown below on this page:
|
|||
The following figure, Logic
Diagram for Single-Track Automatic Block, explains how this unit
controls 2 trains on the same track.
3. Logic
Diagram
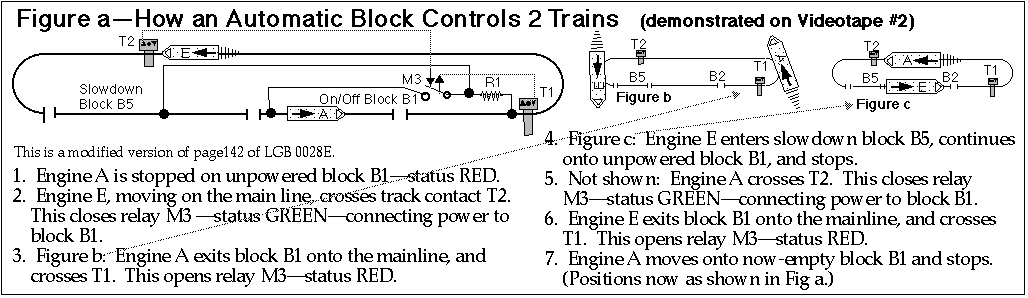
Figure 2 - Logic Diagram
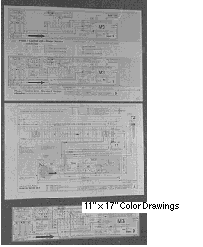
4. Drawing SetNOTE: You can build this automatic block using the instructions and reduced-size drawings included in the Bulletin B9702, starting on page 25, or using the copies at the end of this section on the web. As an OPTION, you can order Item 4. Item 4 includes several of the drawings already included in the bulletin, but full-size and in color, plus the template. Item 4 -- U_BLD_M Drawing Set for Model 146b Single-Track Experimenter's Block Two 11x17 colored drawings & laminated template
Item 4 includes the following: |
||||
5. What The
Drawing Set Produces
Figure 4a shown above,
shows the completed Model 146b Single-Track Experimenter's Block. The
following figure shows the completed control unit and track unit
assemblies -- note they are built as separate subassemblies.
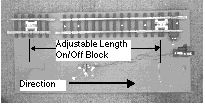
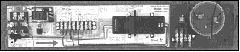
Figure 4 - Model 146b Block - Subassemblies
A standard LGB switch motor
and relay, activated by standard LGB track contacts, controls the
switching on and off the DC track power. You can use any good-running,
properly-geared locomotives right out of the box, with no modifications
except adding a magnet to the bottom to activate the track contacts. This Automatic Block is
essentially "plug and play" when used as a portable control unit and
track unit combination. You just hook up the AC power, and attach the
one remote track contact 'T2'. This unit has the capability
to control a minimum of 2 trains on a single mainline. You can also
completely depower it so it acts inert -- that is, acts just like a
section of ordinary straight track. Videotape Demonstrations I suggest you watch the
videotapes to "get a feel" for how it operates. Section 3 contains a
list of people who have at least one of the videotapes. Objectives You can use this completed
block to operate an additional train with the either the 2-track or
4-track switching blocks. However, if you instead
decide not to proceed any further with the automatic controls, the
parts used to build this Automatic Block are easily "recyclable" to
other model railroad uses. Skills Required To Construct
6. Comments
About Building This Block
This unit, as with
previous Ingram Autocontrol designs, uses all electromechanical
components -- no electronics. The parts are all readily available from
Shiloh Signals, LGB, Radio Shack, and Newark Electronics.
The videotape "Video
Textbook for G Scale Automatic Display Ideas" (Item 2, Basic Videotapes
1 & 2V9202) demonstrates how an automatic block operates, using an
earlier Model 944 unit.
This Automatic Block
is intended to be an "experimenter's block", to get you familiar with
automatic block operation. After constructing and operating this
single-track Automatic Block, you may want to use the other available
plans to build a two-track Automatic Switching Block, a 4-track Zellner
Yard, or custom configurations of your own design.
As long as you can cut
a wire, strip the insulation off the end, and connect it to a screw
terminal following explicit diagrams, you can probably build this
block. All the construction is done by screwing things together, except
2 solder connections to the rheostat.
You can construct a
simple-as-possible "Starter version" to get familiar with how this
block works. Sheet 3, Phase 1 -- Starter Circuit without Slowdown,
shows the schematic. Sheet 9, Phase 1 Control Unit -- Starter
Version, shows the actual control unit layout. Later you can later add a
rheostat and a few wires to expand the control to add a "Slowdown
Block". Now trains will approach a red block at a reduced speed, and
also start-up at a reduced speed when the block changes from red to
green. Sheet 3, Phase 2 -- Standard Circuit with Slowdown,
shows the schematic. Sheet 9, Phase 2 Control Unit -- Standard
Version w/Slowdown, shows the actual control unit layout. As of Oct 96, I was still
experimenting with the capacitor circuit -- it seems to work well with
some trains & layouts, and on others I have observed some jerking
as the engines enters the stop block. So you may want to skip this step
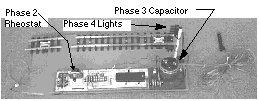
unless it sounds really appealing. You can add a capacitor
wired in parallel with the locomotive motor. Sheet 3, Phase 3 --
Circuit With Slowdown Plus Capacitor, shows the schematic. Sheet 4,
Automatic Block Track Unit Assembly, shows the wiring
-- you add wires 7B, 7C, plus the capacitor. When the block changes from
Red to Green to start up the locomotive stopped on the block, the
uncharged capacitor will drain some of the current away from the
locomotive as it charges up, and thus result in a smoother locomotive
start. When the next locomotive enters the stop block, the charged
capacitor will discharge its energy back into the block, and thus cause
the locomotive to drift to a smoother stop. You can add red and green
signal lights to the block, that will indicate the "state" of the
block. Sheet 9, Phase 2 Control Unit -- Standard Version w/Slowdown,
shows the wiring -- you connect the lights to terminals 2, 15, and 16.
7. The Four
Construction Phases
You can construct this
block in 4 separate phases as follows.
AC Current And DC Current The AC current is what powers
the controls of the block, and the signal lights. The block gets its AC
current from the two wires connected to the knife switch K0, which are
connected to the AC output of the transformer. The AC wiring is
standard LGB circuitry, just like you use to wire your track switches,
except we use the track contracts activate the switch motor, instead of
the orange 5175 momentary switch control box where your finger pushes
the button. The DC current is the track
current that the block controls by switching it off and on, to stop and
start the locomotives. The block gets the DC current from the left (+)
rail of the mainline just in front of the block, and returns it to the
left rail of the stop block and the slowdown block. AC Control Voltage LGB's "standard" control
voltage is 18 volts AC. LGB transformers AC output measures 18 volts.
This works fairly well for indoor operation where everything is clean,
but I think that there is not much margin of error. There have been occasions
when I have been demonstrating my units at shows, where my 110v ac
power connection has been at the end of a series of long extension
cords, and have I watched in dismay and frustration as the switch
motors on my control unit repeatedly failed to reliably change. And
this was indoors -- with no dirt to contend with. Increasing AC Control Voltage A way you can increase the
voltage to 24 volts, is to get one of the little plastic lawn-sprinker
transformers you can buy in hardware stores. Voltage Recommendation The Shiloh Signals
searchlight signals with LED s can be ordered to handle up to 24 volts.
But you have to be careful about overheating any bulbs that may be in
the circuit (such as you have if you use the LGB signals 5092, 5094,
5095, etc). If you use 24 volts and fail
to use the resistors to reduce the voltage to the bulbs, you may burn
them out and melt the plastic housings. Byron Fenton (who has built
several of these units with Ed Zellner) cautions that if you use 24
volts, you must use a 220 ohm 1/2 watt resistor in series in the wire
powering a two bulb unit -- such as the semaphore arm. Byron advises
you use a 100 ohm 1/2 watt resistor in series in a wire powering a one
bulb unit, such as the 3030 indicator light -- the 220 ohm resistor
will also work. BOOSTER: The LGB 52750
Booster is designed to provide more positive operation of switch
motors. However, per LGB catalog 02996 "Lights may not be connected to
the EPL Booster", but should be on a separate circuit. For this reason,
I do not use the Booster with these controls, although you could if you
modified the circuits to keep the lighting circuits separate from the
circuits that actuate the switch motors.
8. Electrical
Comments
This block uses both
AC and DC current.
Probably the most
important factor in getting reliable operation of these control units,
is supplying it with a good "healthy" source of AC control voltage.
This AC control voltage (rectified to DC) is what powers the switch
motor 'M3' that operates the relay.
I have observed that
increasing the voltage to 20 or 22 or 24 volts, appears to improve the
reliability of the operation of the switch motors. Blue Streak
transformers, which a lot of people seem to have, produce about 20
volts AC. Thus Blue Streaks are a good source of AC power. I currently
use a discontinued version of a San-Val pack that supplies 22 volts AC.
I recommend you use
the minimum voltage you can, starting with the "stock" 18 volts, to get
reliable operation of the switch motors. At 24 volts, I believe the
track contacts may wear out a bit sooner. By "wear out", I mean they
start to frequently stick in the closed position -- see page 34,
Sticking Track Contacts for discussion.
A way to emphasize the fact
that there are two trains on the same loop, is to configure the track
plan so the viewer's eye is forced to see both trains at once. You can
do this by using an elevated crossing, or a crossover, or a dogbone --
set them up so, at some point, one train passes close by the other, and
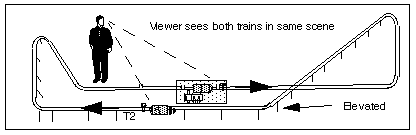
the observer cannot fail to notice that there are 2 trains on the loop. The following 2 figures show
examples of a dogbone and elevated Figure 8, configured so the viewer
sees both trains in the same scene. In fact, as the viewer observes
engine 5 passing by on the mainline as it travels over Contact T2,
engine 1 on the stop block will start up, for "added drama".
9. Track
Planning For Best Visual Effect
You may want to give
some thought to the "visual effectiveness" of the track plan you use
with this block. The reason I mention this is, the effects of a
single-track block operating on a simple oval loop can be subtle --
that is, with a train on one side of the loop and another train on the
other side, a casual observer may never realize there is more than 1
train running.
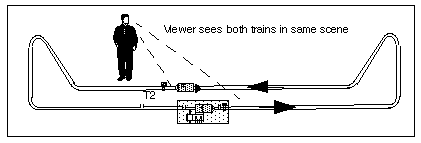
Figure 5a -- Visual Emphasis of Two Trains by
Dogbone
Figure 5b -- Visual Emphasis of Two Trains by Elevated