
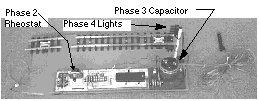
Model 106 Single Track Block |
||||||||||
- [an error occurred while processing this directive]
|
Check Out Steps 55. Verify the light
bulb lights when the knife switch is closed by pushing the handle down
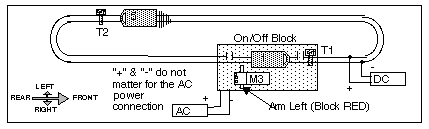
to the right. 56. Verify the arm of
motor M3 moves to the left (RED) when a magnet is held over track
contact T1. 57. Verify the arm of
motor M3 moves to the right (GREEN) when a magnet is held over track
contact T2. Operating Instructions 58. Initial Conditions
1: 59. Initial Conditions
2: Action: Run engine 5
around the loop and verify it will change the block from red to green
back to red as it passes around the loop. 60. Initial Conditions
3: Action: Run trains
around the loop and verify the block will keep them separated. 61. Do this step only
if one of your two engines is consistently faster than the other one. Initial Conditions 4: Action: Run trains
around the loop and verify the block will keep them separated. Slower
engine 5 with the only magnet should always have a green block and
never stop. 62. Do this step only
if you have 3 engines that run approximately the same speed. Action: Run these 3
trains around the loop and verify the block will keep them separated. Note that if one of
these 3 engines is consistently faster than the other two, you can
remove the magnet from it.
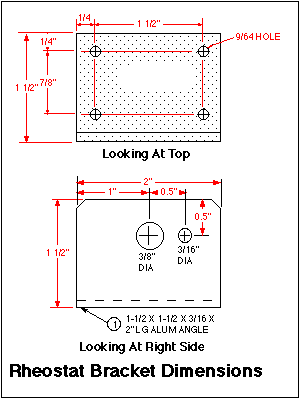
Rheostat Bracket 33. Using the above
figure, Rheostat Bracket Dimensions, as a guide, cut a 2 inch
long piece of 1-1/2" x 1-1/2" aluminum angle. 34. OPTION: To avoid
doing any measuring, you can copy this figure, and rubber cement the
copy of the drawing onto the piece of aluminum. Then you can use a
hammer and center punch, and punch a starter indentation where the
holes are shown on the paper. 35. Drill the 6 holes
as shown. 36. Screw the rheostat
bracket to the wood base. 37. Attach the rheostat
and rheostat knob. Wires 38. Remove BLUE wire
B99 (this is a temporary jumper wire for Phase 1 that is not needed for
Phase 2). 39. Solder BLUE wire D1
to the TOP tap of the rheostat, and connect to terminal 8 on terminal
block TB4. 40. Solder BLUE wire B5
to the CENTER tap of the rheostat, and connect to terminal 3 on the
terminal block. NOTE:
Do not connect wires A1, A2, and Y16 yet. These are for the signal
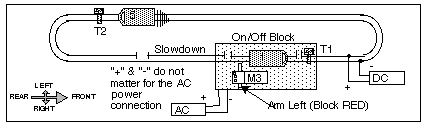
lights, which are not connected until Phase 4. Adding Slowdown Track 42. Connect BLACK wire
3 to the rear 10153 isolating track on the track unit base, as shown
onpage 38, Sheet 4 Automatic Block Track Unit Assembly. Make this wire
about 48" long so you can slide the isolating track back to the rear if
necessary to increase the length of the block. 43. Double check that
this wire 3 is connected to the left rail in the slowdown block, and
not improperly connected to the mainline, and not improperly connected
to the stop block.
With zero resistance,
the block should operate the same as it did in Phase 1. 65. Begin experimenting
with turning the rheostat know CCW, which increases the resistance.
This should start slowing trains down as they enter the slowdown
section, and starting them up more gently when the block changes from
RED to GREEN.
What's The Capacitor Good
For? Please note that this
phase is OPTIONAL. I am still evaluating it's usefulness -- sometimes
it seems to work well, but not always. Adding the rheostat (Phase 2)
produces the most benefit for smoothing out the start up. Make sure you have the
rheostat R1, from Phase 2, installed ahead of (in series with) the
capacitor. You have to have some resistance in series with the
capacitor, or it does not work well at all. Obtaining The Capacitor You want capacitor
sized somewhere in the ballpark, and I emphasize the word ballpark, of
40,000 microfarads, with a working voltage DC (WVDC) of around 25
volts. You sometimes see this capacitance size written also as 40,000 M
farads, or 40,000 m farads. (A micro farad, or m farad, is 1 millionth
of a farad, or 1 x 10⁻⁶ farads.) The biggest size
capacitor Radio Shack handles is 4700 microfarads, so this is too small. I have one capacitor
that is 40,000 microfarads and 25 WVDC, and the size is about 3-1/2
inches high by about 3 inches diameter. You will probably get
positive results with anything sized between 15,000 microfarads and
80,000 microfarads. The 40,000 microfarads is plenty large for my
starter engines. Note that you can also
put several smaller capacitors together by wiring them in parallel with
each other. The total capacitance will the sum of the individual
capacitances. You can also use a
capacitor of higher working voltage than 25 WVDC. The unit, however,
will be larger in size for a given capacitance. You can think of the
capacitor as a very short-term battery, or the electrical equivalent of
a rubber band, or the electrical equivalent of a spring. Charging the
capacitor up when the block changes to GREEN, is equivalent to
stretching out the rubber band, or stretching the spring -- while it's
stretching (charging up), it's "stealing" current from the locomotive
which takes the jerk out of the locomotives start-up. Hooking Up The Capacitor This means the current
must flow from terminal 7 on terminal block TB4, to the (+) terminal of
the capacitor, then from the "-" terminal of the capacitor to the "-"
right track rail. NOTE:
Make sure you do not reverse the (+) and "-" terminals of the capacitor
-- this could ruin the capacitor. 44. Attach black wire
7B from terminal 7 to terminal block TB5. 45. This step,
installing switch K3 is OPTIONAL, but I recommend it. When the switch
is closed, the capacitor will be "in the circuit". When you open the
switch, the capacitor will be "out of the circuit". Thus by turning
this switch on and off, you can easily compare the operation with and
without the capacitor. The easiest way to
install it is to solder two stiff wires about 2" long onto the switch,
put spade terminals on the other ends, then just slide screw it to
terminal block TB5. 46. Attach remaining
wires 7B2, 7C, and 7C2. Make sure wire 7C2
connects to the right (-) rail.
67. Set toggle switch
K3 to the rear, which should disconnect the capacitor. Then verify the
block operates exactly the same as it did for the Phase 2 version. 68. Set toggle switch
K3 to the front to connect the capacitor. Adjust the rheostat about in
the middle. NOTE:
Do not set the rheostat all the way forward (zero resistance) when
using the capacitor. Without resistance in
the circuit, the capacitor "sucks up" current too quickly, and drops
the voltage when the block changes to GREEN, as it acts like a short
circuit when it first starts charging. This momentary
short-circuit effect and resulting voltage drop will jerk the engine on
the mainline, and may make your transformer unhappy. Making sure there is
some resistance in series with the capacitor, prevents the
short-circuit effect. 69. Experiment with the
capacitor, by varying the rheostat setting.
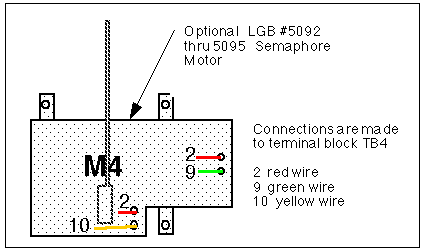
The template shows the
wiring for lighted signal, such as the Shiloh two-light #GS2S units, or
the Model Power #990 two-light units. The Model Power units are
cheaper, but they use bulbs, and seem to me to be disturbingly fragile.
The Shiloh units are probably preferable -- they are sturdier, plus the
high intensity LEDS should last longer than bulbs. You can also hook up
semaphore units such as the LGB 5092 through 5095 series, although this
is slightly more complicated, as you are adding a second motor to the
system. Hooking Up Signal Lights 47. Hook up yellow wire
Y16, and gray wires A1 and A2 as shown. 48. Position the
light on the track unit. Note that Sheet 4 shows a suggested location
for the signal light on the front of the track unit. 49. Hook up terminals
15 and 16 of terminal block TB4 to the red and green lights. 50. Hook up the
common (-, ground) wire from the lights to terminal 2 of TB4 as shown. Checking Signal Lights 51. Push the arm of
motor M3 to the left (RED) position. Verify the red signal light is lit. 52. Push the arm of
motor M3 to the right (GREEN) position. Verify the green signal light
is lit. Alternate 1 - Using LGB
Semaphore Signal For Lights Alternate 2 - Using LGB
Semaphore For Lights & Relay Because this system
uses 1 motor to power 2 mechanical items (relay and semaphore arm), it
has in the past seemed to be less reliable. Since 1988, to improve
reliability, I have been using 1 motor for relay points only, and a
separate motor for operating mechanical semaphore arms (if one is used). Therefore, based on my
past experience, I do NOT recommend using 1 motor for both relay and
semaphore arm, but you may want to experiment. If you use the Booster
or higher voltages, you may be able to get reliable operation of both
mechanisms from one motor.
Possible Malfunctions The first two problems
are pretty much self explanatory. The last two are described in more
detail as follows:
If the system suddenly
malfunctions, you can check for an "incomplete throw" by doing the
following: Once when I tried to
run 2 trains on the gray 1/2 amp starter set pack, I noticed the
automatic block I was using started making incomplete throws,
apparently because the AC side of the starter pack was dropping in
voltage as a result of my loading the DC side of it to the maximum. You will occasionally
encounter this problem of a motor sticking and not throwing entirely.
However, if a motor starts doing this repeatedly, try replacing it with
a new one. "Tuning" The Switch Motors I usually check the
centering on the motors I put on units I build, but you can double
check by performing the following steps: Note that you can
move the arm with the rack to one side or the other a tooth at a time,
but carefully letting the teeth slide over the pinion while the
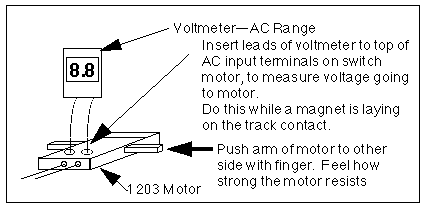
position of the pinion remains centered. Checking Voltage Across
Switch Motor Terminals Note you can measure
the voltage at each motor for each of the two track contacts hooked to
it. Expect voltages somewhere in the ballpark around 8.5 volts to 9.6
volts AC for an 18 volt power source. Note that this voltage
measurement you are seeing is not really accurate, as you are measuring
a half-wave rectified signal. The main value should be that you can
compare the values produced by different track contact relative to each
other, to see if any of readings are significantly lower than the
others. I would advise against
leaving the AC power on for very long when the track contact is in the
constantly-closed position due to the magnet laying on it. LGB claims
that you can apply constant AC voltage to the motors without damaging
them, but I notice the motors quickly get hot under this condition.
Occasionally a track
contact will stick in the closed position, and thus "jam" the system.
If the system suddenly malfunctions, you can check for a stuck track
contact by doing the following: Stop all trains
immediately, making sure no engines are parked on top of a track
contact. Push the arms of the
motor M3 to the other position, then return it to the original
position. If a track contact is stuck, the motor will have power
applied to it when it shouldn't, and thus will "fight you" when you try
to move it. If you find evidence of
a sticking track contact, you can identify the sticking track contact
as the one that causes the motor to go to the position it is sticking
in. For this single-track
block, a sticking T1 contact will jam motor M3 in the left (RED)
position. A sticking T2 contact will jam motor M3 in the right (GREEN)
position. After identifying the
sticking track contact, tap it several times with your finger. This
will usually cause it to stop sticking and return to the "open"
position. Often a track contact
will stick once in a while, but operate properly for several hundred
times before it sticks again. However, you may encounter a track
contact that begins to stick repeatedly, in which case you should
remove it and replace it with a new one. |
|||||||||
This page created 8/2003, modified 5/5/2006 by[an error occurred while processing this directive]